In this blog, we will create a drag-and-drop effect for your website. Drag-and-drop interactions can significantly increase a website's interactivity and create a better user experience. In this blog, we will explore two ways to create drag-and-drop effects for your website using Framer or Spline. Both methods have unique features and their own strengths, which we’ll compare to help you choose the right tool for your project.

Method 1: Creating Drag-and-Drop Effect in Framer
Framer is a powerful design tool that makes it easier to create drag-and-drop effect.
Steps to Create Drag-and-Drop in Framer
Step 1: Set Up the Canvas
- Press the "F" key to create a frame.
- Name it “Main” (or any name you prefer), set it as a stack, and give it a height of 100vh and width of 1fr.
- Add another frame in the middle and make it size of (3000x3000px), make it transparent, and name it "Canvas". Pin it to the center of the viewport.
Step 2: Set Constraints

Limit drag movement using constraints:
- Set the Main layer in the constraint area and assign a scroll section name to “main”.
- Link the “Canvas” layer to this section in the drag effect settings.
Step 3: Add Drag Effect
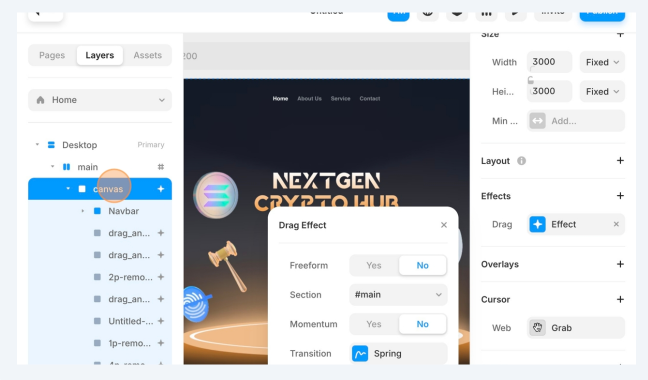
- Select the Canvas layer and add a drag effect from the Effects panel.
- Turn off Freeform Mode and set the section to Main.
- Also, turn off Snapback and Momentum to allow smoother dragging.
- Preview your design to ensure everything works.
Step 4: Add Elements
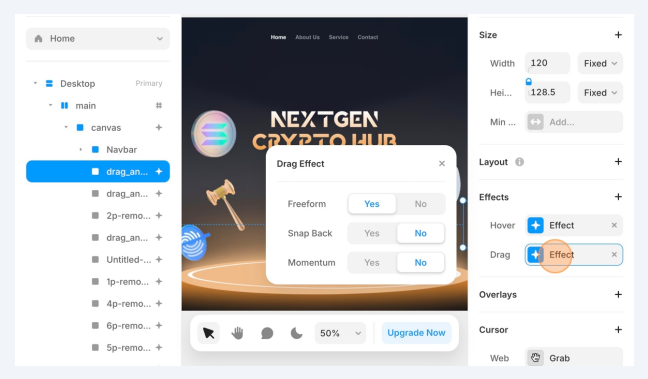
- Add items like shapes, images, or icons to the draggable layer.
- Select all the draggable items, go to the effects panel, and set the drag effect to Freeform mode. Turn off Snapback and Momentum here as well.
- Ensure the Overflow property for the Canvas layer is set to Visible.
Step 5: Add Hover and Rotation Effects
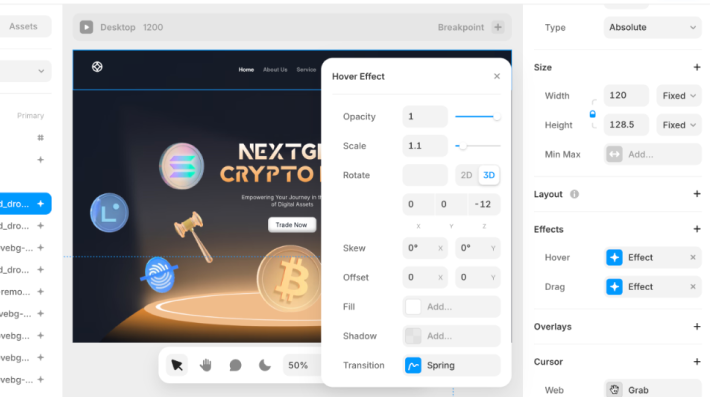
- Make it dynamic! Add animations like:some text
- Hover Effects: Scale up the size of items when items are being dragged.
- Rotation: Slightly rotate items for a playful and engaging effect.
Method 2: Drag-and-Drop Effect in Spline
Spline takes interactivity to the next level by integrating 3D objects and animations into your website. If you want something immersive and eye-catching, Spline is your go-to.
Steps to Create Drag-and-Drop in Spline
Step 1: Select Objects

- Pick the 3D objects in your scene that you want to make draggable.
- Open the Simulation Panel, enable Physics, and set gravity to 0 for a stable drag-and-drop effect.
Step 2: Add Drag-and-Drop Event

- Select an object to start the drag-and-drop effect.
- Go to the Events Panel, create a new event, and choose Drag and Drop.
Step 3: Customize Drag Settings
Adjust settings to refine your effect:some text
- Cursor Appearance: Choose "Hand," "Move," or "Default" for the hover cursor.
- Plane: Set to Adaptive to Camera.
- Damping: Set values (e.g., 1 for instant drag or 80 for slower, smoother drag).
- Relative To: Choose World coordinates for more flexibility.
- Drag Limits: Define boundaries for X, Y, and Z axes to restrict drag movement.
Step 4: Add Objects
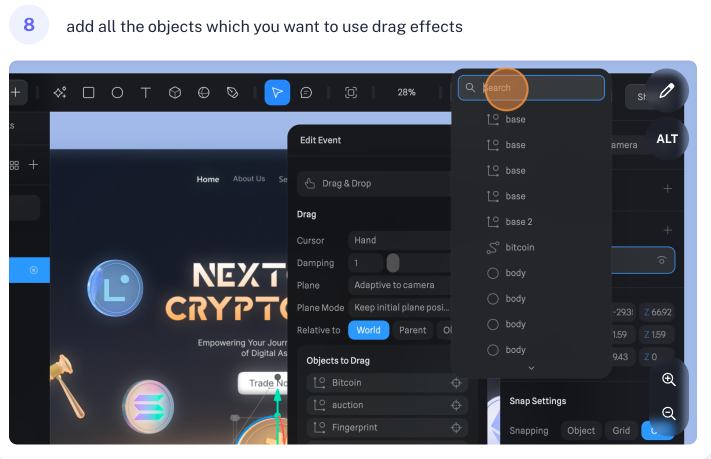
- Add all the draggable objects to the drag-and-drop event list.
- Test it out to see how your objects behave.
Step 5: Enable Physics

- For extra realism, turn on Physics for your draggable objects and set their Body Type to Dynamic.
Step 6: Test Your Animation
- Enter preview mode and check if the drag-and-drop effect works smoothly.
- Fine-tune the physics and animations as needed for the best experience.
Which Tool Should You Choose?
- Framer: Go with Framer if you’re working on a 2D project that requires a fast, intuitive setup and lightweight and fast loading performance.
- Spline: Choose Spline if your project demands visually immersive 3D effects or physics-based interactions. But larger file size can impact load times especially with complex 3D scenes.
Both tools have their strengths, and the best choice really comes down to what you’re trying to achieve. If you’re after something simple and straightforward, Framer is a great option. But if you want to push the boundaries with cutting-edge 3D interactions, Spline is the way to go. Either way, you’ll end up with a drag-and-drop effect that makes your website more interactive and engaging for users.


.jpg)
